Want to turn your existing website into a fully functional mobile app without hiring a team of developers? With Applikeweb, you can use AI to convert any site into native Android and iOS apps in just a few steps. Below is a complete walkthrough—from entering your URL to generating APK and AAB files for Google Play, plus what you need to know to test on iOS.
Why Convert a Website to a Mobile App?
- Better engagement & retention: Push notifications and home‑screen presence keep users coming back.
- App Store discoverability: Reach new users browsing Google Play and the App Store.
- Offline & native features: Access device capabilities (camera, geolocation, etc.) your mobile site may not fully leverage.
- Faster launch vs. custom dev: Skip months of coding; ship in days.
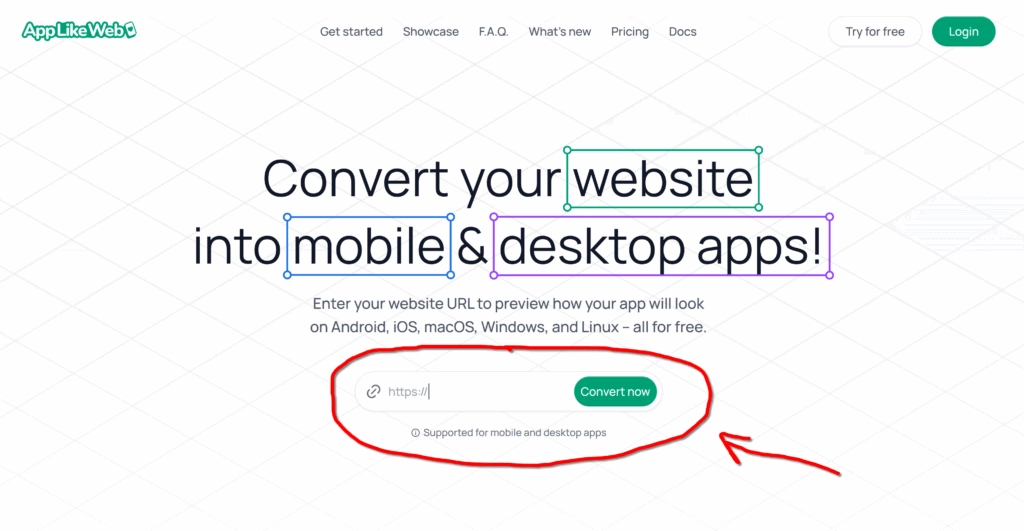
Step 1: Enter Your Website URL
- Go to Applikeweb.
- Paste the URL of the website you want to convert into a mobile app.
- Click to proceed—our AI will start preparing the app wrapper around your site.
Step 2: Choose Your Platform (Android or iOS)
You’ll be asked which build you’d like:
- Android – Quick to test via an APK file.
- iOS – Requires an active Apple Developer Account to test on real devices or distribute via TestFlight/App Store. (Apple’s ecosystem doesn’t allow unsigned apps.)
Tip: You can start with Android to validate the experience, then move to iOS once you’re ready.
Step 3: Customize Your App in the Dashboard
After the initial conversion, you’ll land in your personal dashboard. Click “Edit” to configure visuals and metadata.
App Information Fields Explained
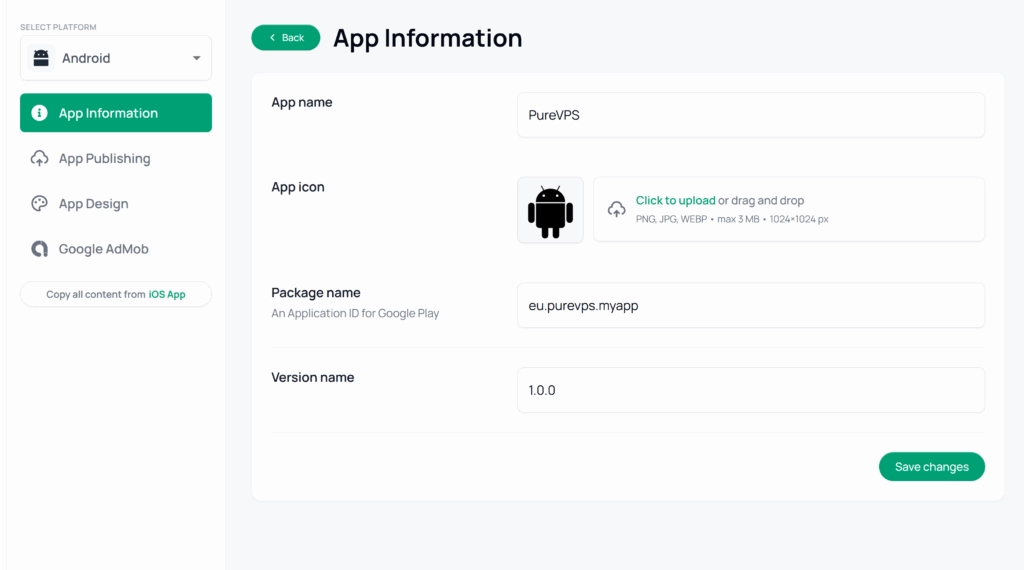
- App name – The title users see on Google Play / the App Store and under the icon on their device.
- App icon – Upload at 1024×1024 px. This is mandatory for both stores.
- Package name (Android) / Bundle ID (iOS) – A unique ID required by the stores (e.g.,
com.yourbrand.app). - Version name – Human‑readable version (e.g.,
1.0.0). Increment this for each release.
Continue exploring other settings like splash screens, color themes, navigation behaviors, and permission prompts to ensure the app reflects your brand.
Step 4: Generate Your App Build
When you’re done customizing, click “Generate app”. Applikeweb’s build system will compile your app and provide you with a downloadable archive.
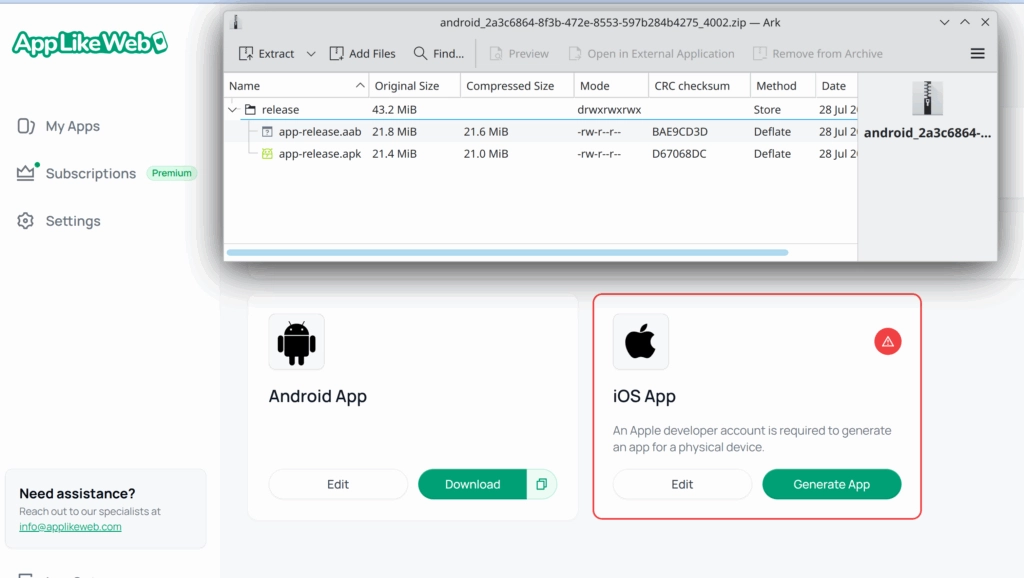
Inside the Archive You’ll Find:
- APK – The Android Package Kit for direct installation on Android devices. Great for quick testing and sharing with your team.
- AAB – The Android App Bundle required by Google Play Console for publishing. Google generates optimized APKs for different device configurations from this bundle.
(For iOS builds, you’ll typically get an .ipa file or Xcode project—follow Apple’s distribution guidelines.)
Publishing & Testing Checklist
Android:
- Create a Google Play Console account.
- Upload your AAB, fill out the store listing (description, screenshots, content rating), and roll out a test track or production release.
iOS:
- Enroll in the Apple Developer Program (if you haven’t already).
- Add your app in App Store Connect, upload via Xcode/Transporter, set up TestFlight for beta testing, and finally submit for review.
Common Pitfalls to Avoid
- Using a non‑unique package/bundle ID: Stores will reject duplicates.
- Low‑quality icons or screenshots: Follow size guidelines to avoid rejections.
- Ignoring versioning: Each update must increment the version number.
- Not testing deep links or login flows: Ensure your website’s critical paths work smoothly within the app wrapper.